 |

Custom Part List |
Summary
Custom parts lists may be created which can be either assigned to units or directly used on an estimate.
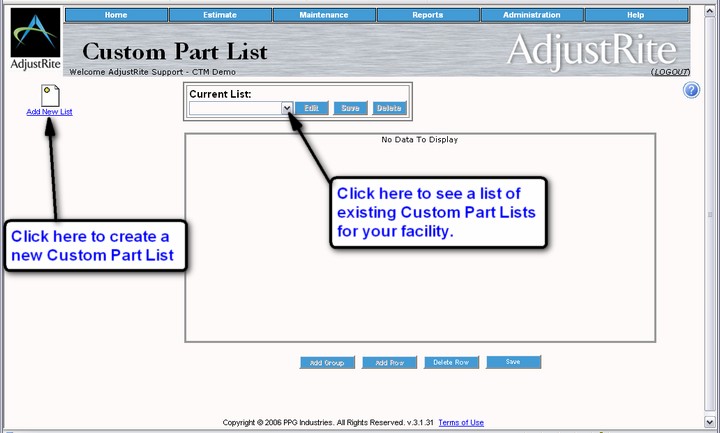
The top part of this screen is used to maintain the names of custom parts lists. You can add new custom part lists, edit existing part lists names and delete custom parts lists you no longer need.
The bottom part of this screen is used to maintain the parts detail for custom parts lists. Once parts lists exist, you may use the bottom part of this this screen to add, change and delete parts from each custom parts list and organize them within groups.
Detail Instructions
Use the drop-down maintenance menu to maintain custom parts lists.
You can create, modify and delete custom part lists on the Custom Part List screen.
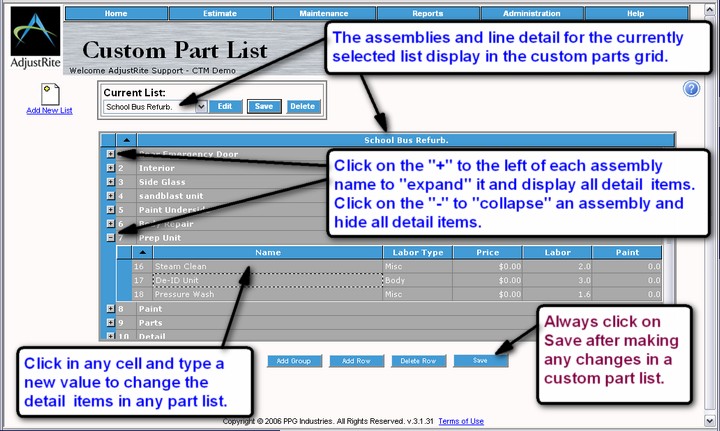
When you create a new Custom Part List you first name the list and optionally specify a year range, Make and Model for the list. Once you have saved the new list it will be available to edit. Please note that after you create a new list, the name you have given to the list will appear in the Current List box. The assemblies and the parts they contain will display in the custom parts grid for the custom part list showing in the Current List box.
After you have added a new list or selected an existing list the name of that list will display in the header of the custom parts grid.
Be sure you click on the
button after you have made any changes to the selected custom part list, as any changes you made will be lost if you do not save.
Maintain Parts List Names
- Add a new custom parts list by clicking on the Add new List link: This will open a new window with the title "AdjustRite - Edit Custom Part List". This window contains the following information:
- Custom Part List Name: Enter the name to identify this list. You will then be able to use this name for locating the custom part list, either for changing it from this screen or to assign it to a claim.
- Year From: Pick the first model year that is valid for parts in this list. You may create lists for the same make and model, but with different parts based on the model years. This will help you associate the right parts with the right vehicle.
- Year To: This is the last model year that is valid for parts in this list.
- Make: This is the name of the Make of vehicle these parts should be associated with. This field is for information only, and does not cause the custom parts list to be associated with a specific vehicle.
- Model: This is the name of the Model of vehicle these parts should be associated with. This field is for information only, and does not cause the custom parts list to be associated with a specific vehicle.
- Current Facility Only check box: Check this box if you want this custom parts list to only be available for estimates created in this facility. If you then create an estimate in another facility and look for custom parts lists this list wouldn't show at all. If you don't check this box, the parts list will be available in all facilities of your company. If you create a list for a single facility and want to share it with other facilities, edit the list, uncheck the box and save it again. The list will then be available for all facilities in your company.
- Save button: Click on the save button when you want the custom parts list to save the way it looks on the Edit Custom Part List box. If you close the pop up box without clicking on the Save button your new custom parts list will not be saved. Once you click on Save, this list will show is your list of custom parts lists (see below).
- Edit a custom parts list by clicking on the "Edit" button after selecting a custom parts list. You can then make changes to a custom part list and save the changes. If you change the name here, the list will afterwards be listed using the new name. It is important to note that if you don't click on the Save button, the changes will not be saved. Please note that this refers only to changing the name, year range, make and model for this custom list - all changes to the detail items contained in the list are made in the custom part list grid below.
- Delete a custom parts list by clicking on the "Delete" button after selecting a custom parts list. A warning box will pop up in the middle of your screen asking if you are sure you want to delete this custom parts list. Click on the "OK" button to delete the list or click on the "Cancel" button (or close the box by clicking on the "X" on the top right corner) to abort the delete process. It is important to note, once you delete a custom parts list it is completely gone, including all the parts entered for the list, so only delete custom parts lists when you are certain you don't need them anymore.
Maintain Parts List Detail Grid
When a custom parts list is active, all assemblies for that list will show in the parts list grid, and the name of the list will appear in the heading section of the parts grid. The groups displayed in this grid will show in the Available Parts List (on the Estimate screen) when this Custom Parts List is used on an estimate. The following functions may be performed on the detail custom parts list grid.
Click on the "+" in front of a group description. This will expand the group (assembly) and show all detail items grouped within it. All detail items are grouped within assemblies. If you delete the last part within an assembly it will no longer list in the custom parts list grid.
Click on the "-" in front of an assembly which is already expanded. This will collapse that assembly, so that only the assembly name will show in the grid.
Add Group button: Click on this button to add a new group to the currently selected custom part list. The new group will be completely empty when first displayed, but if you click on the Save button at the bottom of the screen the blank description will change to "New Group". Click in the group heading box and enter the name of the group as you want it to appear on estimates. It is important to note that new groups are always added to the bottom of the custom parts list grid - the order of groups may be changed by clicking in the number field to the left of the group description and entering a new sequence number. For example, if a new group adds as group #11 , but you want it to show as the 5th group, just change the "11" to "5" and click on the
button - this will cause the groups to display by the sequence number, with the new group moved to row 5 and everything else moved down.
Add Row button: Rows may be added to groups by first selecting the group (by clicking on it) and then clicking on the Add Row button. The new row will always be added to the bottom of the selected group, but can easily be moved anywhere within the group by changing the sequence number to the left of the row description and then Saving the list. It is important to note that detail rows can never be moved outside of the group they were created in.
New rows always start off blank, they will contain no detail information until you enter it. It is often fastest to click in the Name column for a new row and then press the TAB key after entering values in each column as you move across the row. All columns are optional, although it doesn't really make sense to leave the name column blank.
- Click in the Name column for the new row and type the description you want to print on estimates using this item. You can change this description later.
- Double-click in the Labor Type column for the new row and then click on the list box that appears. Assign a labor type to the new row.
- Price for the row. The price you enter here will automatically be used on any estimate to which this row is added. You may change the price once the row has been added to an estimate, but changes made there will not change the price in the custom part list.
- Labor hours for the row. You should not enter anything in this column if the labor type you selected above was "Paint". Labor hours will also not be added to an estimate if the part is "Repaired" instead of replaced, as the number of hours for the repair will vary from one estimate to the next.
- Paint hours for the row. Paint hours will always be added to the estimate if this part is used, even if the item is repaired.
Delete Row button: Click on a part in the part grid to select it and then click on the Delete Row button. A message box will pop up in the middle of your screen and ask if you are sure you would like to delete this row. Click on the "OK" button to delete the part or click on the "Cancel" button to keep the part. You can also just close the message box to cancel the delete operation and keep the part.
If you delete all the parts for a parts group that parts group will be gone also. This means that part group will not shop up in the grid for this custom parts list and that it will no longer be one of the available parts groups on the Edit Part window.


