Company Maintenance |
Summary
The structure for your company is maintained on this screen.
The Company Information and Facility Information will determine how your estimates are organized, as all estimates are associated with a facility and can only be accessed by users who have permission to login to those facilities. The company information and facility information is also used to print at the top of various reports. You may also load company logos on this screen, which will print on your reports.
Detail Instructions
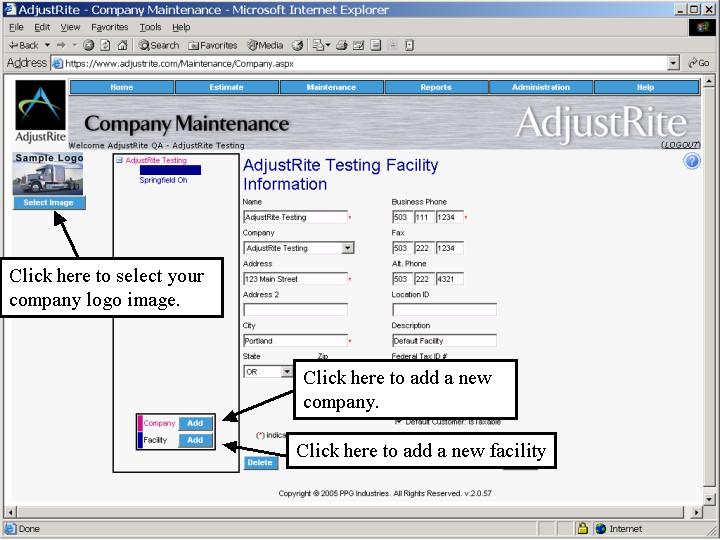
Company Logo's will display to the far left of this screen. Company logo's are optional, and may easily be changed at any time.
- Click on the Select image button below either the Upper Left Corner or Upper Right Corner image.
- You may either directly enter the path of your logo file or use the Browse button to locate the logo files you want to use for your company.
- Click on the Submit File button to load your logo and return to the Company Management screen.
- The image selected will now display on the Company Management screen and will be included in the heading of your reports.
Company structure. The tall rectangle to the right of the company logo's contains a "tree" style representation of your company. The name of your overall company is always at the top of the tree. For example, if your company is named ABC company, you will see ABC Company at the top of the tree.
Beneath the parent company you can enter subsidiary companies and facilities. All companies show on the tree as Red and all Facilities as Blue. Notice that the parent company has a "-" in front of it when you first come to this screen. You can use this to "collapse" all detail below that level on the tree structure. Once it is collapsed there will be a "+" in front of the collapsed company. Click on the "+" to "expand" the detail below that level.
You can add a new company by clicking on the Add button by the red Company label below the tree structure. Fill in the new company information (see the detail instructions for the Company Information screen below). Be sure to click on the Save button after adding your new company, or it will not be saved.
You can add a new facility by clicking on the Add button by the blue Facility label below the tree structure. Fill in the new facility information (see the detail instructions for the Facility Information screen below). Be sure to click on the Save button after adding your new facility, or it will not be saved.
Click on a company or facility in the tree view to see the detail on the right side of the screen.
- When you click on a Company the right side of the screen will show the Company Information screen. You will then be able to make changes to the following boxes and Save your company information:
- Name: Enter the name of your company. If this is a subsidiary, enter the name of the subsidiary. This field is required. This will automatically be filled in with the name of your company after your registration process for the parent company on the tree.
- Company: This is a list box, which shows all possible companies you can assign as the parent company. When you are editing the parent company, there will be no choices here, as the parent company may not be assigned to one of it's own subsidiaries. You can change the parent company of a subsidiary company, by simply selecting a different company from this list. Of course, if you do not have a multi-company corporate structure, you will never have more than one company listed here.
- Address: This should normally be the mailing address for this company.
- Address 2: This can optionally be used for extra address information, like a suite number.
- City/State/Zip: City, State and zip code for the mailing address of the company..
- Delete button: Click on this button to delete a company. A message box will pop up in the middle of the screen, asking if you are sure you want to delete this item. Be very careful about deleting company records. Please contact AdjustRite support if you have any questions. The delete button is disabled when you select the parent company, as it may not be deleted.
- Save button: Click on the save button if you want to save any changes you have made on this screen. If you leave the screen or click on another company without first clicking on the Save button, none of your changes will be saved.
- When you click on a Facility, the right side of the screen will show the Facility Information screen. You will then be able to make changes to the following boxes and Save your facility information:
- Name: Enter the name of each facility here. If this is a subsidiary, enter the name of the subsidiary. This field is required.
- Company: This is a list box, which shows all possible companies you can assign as the parent company of this facility. You can change the parent company of a facility by simply selecting a different company from this list. Of course, if you do not have a multi-company corporate structure, you will never have more than one company listed here. You must always have something selected here unless you are looking at the "master" company record.
- Address: This should normally be either the mailing or physical address for this facility.
- Address 2: This can optionally be used for extra address information, like a suite number.
- City/State/Zip: City, State and zip code for either the mailing or physical address for this facility.
- Delete button: Click on this button to delete a facility. A message box will pop up in the middle of the screen, asking if you are sure you want to delete this item. Be very careful about deleting facility records. Please contact AdjustRite support if you have any questions. The delete button is disabled when you select the parent company facility, as it may not be deleted.
- Business Phone: Primary business phone for this facility.
- Fax: Primary fax number for this facility
- Alt. Phone: Secondary business phone (if needed) for this facility.
- Location ID: You can enter a reference code for a facility in this box. This is not used for processing, but is only a reference.
- Description: Optional description about the facility.
- Federal Tax ID#: The federal ID for each facility.
- License Number: You can optionally enter your license number here. This does not show on the restimate report.
- Taxable check box: Check this box if you want estimates created in this facility to be taxable. If you uncheck this box, estimates won't calculate tax by defaul, even if the profile used on an estimate includes tax. You can override the taxable status of each estimate when you create it.
- Save button: Click on the save button if you want to save any changes you have made on this screen. If you leave the screen or click on another facility without first clicking on the Save button, none of your changes will be saved.
- Select Image: You may select an image as your company logo. This image will print at the top left of each of the estimates for your company. The system will automatically resize your logo so that it fits on the space available for the logo on the estimate report. Make sure your logo image is large enough to have sufficient detail when printing estimates.