
Estimate |
Summary
All detail parts and labor are entered on this screen. This is the core of the estimating process.
This screen is different than other screens in AdjustRite in that all data is saved continuously. If you change a part description that change is saved immediately. Change a price and that price change is saved immediately. This means you will not loose data on your estimate if you somehow loose your connection to the internet or forget to save.
Both the parts available for the estimated unit and the parts used on the estimate are listed within grids on this screen. These grids permit the display of a large amount of information within a reasonably small space. All parts on the grids are grouped by part assemblies. Each assembly may either be displayed as a single row, displaying the title for the group of parts in that assembly, or displayed with all parts displayed below an assembly title.
Detail Instructions
When you first see this screen you have already entered customer, unit and rate information. This is true if you have either just begun a new estimate or if you have searched for and selected an existing estimate which already has customer, unit and rate information entered.
The Heading of this screen works like all other screens, with the drop down menus on the top of the heading, the title across the main heading bar and the AdjustRite logo at the left. As on all other pages, clicking on the logo will take you to the Home screen.
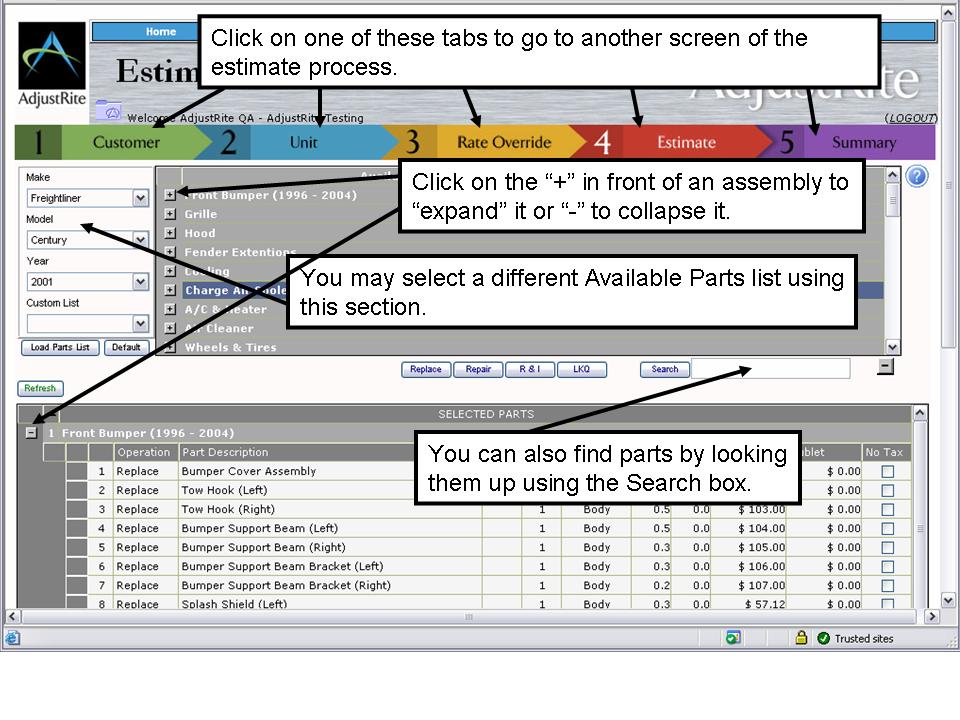
SELECT A PARTS LIST using the Make, Model and Year or Custom List to the left of the Available Parts grid. This feature will let you use a different parts list than the one for the vehicle you selected on the Unit screen of the estimate process.
You may also use multiple parts lists on the same estimate. Simply add parts from one available parts list to your estimate and then select a different parts list and click on the Load Parts List button to activate it. You may use both AdjustRite parts lists and your own custom part lists on the same estimate. For example, you can select a tractor using the Make, Model and Year for the damage to the front of school bus and then select a custom list you have created for the damage to the body of the bus.
THE AVAILABLE PARTS GRID contains a list of all parts available for the unit selected. The year, make and model will always display in the title bar with the date the estimate was created listing within parenthesis.
All parts are grouped with similar items, and those groups will be "collapsed" unless you "expand" them. For example, parts such as a Bumper Center Cover or Bumper Cover End (left) are grouped within the Front Bumper. Only group titles are shown when you first get to this screen. Click on the "+" in front of them an a group title to "expand" the assembly and show all the parts inside of it. You may never change any information in the Available parts grid. In order to change such things as the description and hours you need to first select the part and copy it to the Selected Parts grid and then make your changes in the Selected Parts grid.
Expanded groups display with a "-" button in front of the group title. Click on the "-" to collapse the parts in that group and only display the group description again.
Parts in this grid may be selected using one of the following methods:
- Expand a group by clicking on the "+" and then selecting individual parts in the "expanded" group. When a part is selected the display will change to show white text against a dark blue background.
- Click on a single row
- Click on several rows while holding down the Ctrl key. Clicking on any row after you release the Ctrl button will deselect all the rows selected. Ctrl clicking on a selected row will deselect that row without changing the selection status of any other rows.
- Click on one row, then hold down the Shift key while clicking on another row - all rows from the first to the last will be selected.
- Click on one row, hold the mouse button down and slide the mouse pointer down the row of the open assembly. You will see each of the rows "select" (turn dark blue) as you pass over them.
- Click on a group title. This will visibly select the group, but will not visibly select the parts within the group. However, selecting the group title will select all the parts identified by the system as "Included When Selecting Entire Assembly". For example, clicking on the Front Bumper group title for the 2002 International Century will auto select the Tow Hook (Left), but will not auto select the Bumper Side Garnish (Left). Selecting a group is handy when you expect to replace the entire standard assembly.
After selecting parts, you may copy them into the Selected Parts grid by clicking on of of the following buttons immediately below the Available Parts grid:
- Replace will identify parts in the Operation column as "Replace" items. Replaced parts will copy the standard Labor Type, Labor hours and Paint hours Available Parts grid to the Selected Parts grid. The most recent prices you have charged for each part in your shop will also display.
- Repair will identify parts in the Operation column as "Repair" items. Repaired parts will copy the standard Paint Hours, but will set the labor hours to "0" and the price to "0.00", as the part is not being replaced and the time to repair an item will vary, depending on the damage.
- R & I will identify parts in the Operation column as "R & I" items. R & I parts will copy the standard R&I hours, but will set the paint hours to "0" and the price to "0.00", as the original part in the Available Parts grid.
- LKQ will identify parts in the Operation column as "Replace" items, but identified the parts as "LKQ" in the "Incl" column. The labor and paint hours are kept the same, but you should enter the price you paid for this used part in the price column.
SEARCH:You can look parts up using the Search box. Just enter a word you think is included in the description of the part and click on the Search button. For example, if you enter "Hose" in the Search box and click the Search button you will all the parts listed that contain the word "Hose". This could include items like "Hose Clamp" or "Elbow Hose".
The part search will pop up and show all the parts with your search text contained in the part description. Three buttons will show to the left of each part in the Part Search grid. Clicking on each button will perform the following function.
- Replace will add the part to the Selected Parts grid, just as if you had first clicked on the GoTo button and then clicked on the Replace button below the available parts grid after the assembly was opened and the part selected.
- Repair will pop up a small window (the SearchRepairPrompt window). The labor hours will be 0, but the paint hours will show the standard hours to Replace this part. You can enter the labor and paint time to repair the part you have selected. These values will then show up in the Selected Parts grid with the repair part.
- R & I will pop up a small window (the SearchRepairPrompt window again). You can either accept the standard labor and paint time to R&I this part or enter your own time and then click the Submit button.
THE SELECTED PARTS GRID contains all the parts you copied from the Available Parts grid. Some of these parts require additional information before your estimate is complete. For example, the first time you use a part on an estimate it will show with a price of "0.00", but once you have entered prices for a part it will always show up with the most recent price you have charged for the part.
You may change any of the information showing in the Selected Parts grid. The cells of the grid are much like the cells of a spread sheet. The following actions can be used directly inside this grid:
- Click on the "+" in front of a group to "expand" it, or if it is already expanded, click on the "-" in front of the group to "collapse" it.
- Click on a group title to select the entire group. Actions taken with the title selected effect the entire group - so if you select the group title and then click on the "Delete Row" button the entire group will be removed from the Selected Parts grid. You may also select a group title and then retype the text in the group title. This revised text will show on the screen and on the printed version of the estimate.
- Click on any cell of a row to make it "active", so that you can type something in it. For example, if you click in the Part Description cell for a row you can type a new part description. This description will be saved for this estimate, but will not change the description of the "base" part, so it will come up with the original description next time you select it.
- Double click on any cell of a row to enter "edit" mode. For text or numbers this means the contents of the cell are highlighted instead of the whole cell. For the Operation and Labor Type cells you will be able to pick a new option from a list.
- Operation column: When you double click in this cell you can change the operation for the part. This will most often be used when you have added a new row and need to specify the correct operation for the row. This can also be used, to change the operation for an item you copied from the Available Parts grid by selecting Replace or Repair. Please remember to double check your hours if you do this, as the system will not automatically change your hours to the standard hours for replacing an item if you change the operation from Repair to Replace. You can also change the operation by simply clicking on the cell and then entering the first letter of what you want (for example press "b" until you see "betrmnt" some up) then press the Tab key to accept the new operation.
- Labor Type column: When you double click in this cell, you can change the Labor Type for the row. This can be useful if you decide you would rather show a part as a Mechanical labor type, even though it is stored in the AdjustRite part database as a Frame labor type. Be careful using this option, as the dollar value of the estimate will change if the new labor type has a different labor rate on your Rate Override screen than the labor type you changed from.
- Press the Esc key: If you have clicked on a group title or part description and accidentally started typing, the text will change. Press the Esc key before you press any other "action" keys and the text will go back the way it was before you started typing.
- Press the Tab key: This is a handy way to tell the system you are done entering something in a cell. The cells will be highlighted to the right until the end of the row is reached, at which point it will wrap to the first cell in the next row.
- Arrow Keys: You can use the up or down arrow keys to move to the cell below or the cell above the current one. This can be a handy way to enter new prices down a column by just pressing the down arrow key after entering each new price. The left and right arrow keys move you within the text of a cell if you have double clicked on it, but will move right and left across the grid if you are not in edit more.
There are several buttons below the Selected Parts grid, and one immediately above it. These buttons can be used to make various changes to the estimate.
- Refresh: Press refresh any time you want to refresh the screen. This can be helpful if you have changed the sort order of groups and want to resort them based on the sort order you have entered. Using Refresh will close all groups in the Selected Parts grid, so that the screen can be displayed more quickly. You can expand all groups at one time by clicking on the large "+" at the bottom right of the grid or expand groups individually.
- MarkUp: You may want to enter all your prices in the estimate and then mark all those prices up by a percent. This button will let you do just that. Enter the markup percent in the text box to the left of the MarkUp button and then click the button. For example, a part in the Selected Parts grid may have a price showing of $100.00. Enter "50" in the box to the left of the MarkUp button and then click MarkUp. The price for the part will be increased to $100. Caution - this will change all the part prices on the estimate and there is no "undo" function. When you MarkUp prices for parts, those prices will automatically show up as prices for those parts next time they are used on an estimate. You may also mark prices down by using a negative %. For example you can enter "-10" to take 10% off all the prices showing in the Selected Parts grid.
- Lock Estimate: Once you lock an estimate, you can't make any changes to it. The parts on the estimate, along with their prices and hours are fixed once you click on the Lock Estimate button. The system will warn you before it locks the estimate. You can create supplements after you lock an estimate.
- Create Supplement: This will create a supplement if your estimate is locked, as you can not change a locked estimate. After you create a supplement you will have two separate versions for this estimate - the original locked estimate (which you can print, but no longer change) and the new supplement which can be both edited and printed.
- Add Row: Clicking this button will add a new row at the end of the selected group with the description "New Part". Select a group by either clicking on the group heading or on any part within the group. It doesn't matter if you select the first or the last part within the group, the added row will go at the end. You will need to change the Part Description, Labor Type, Labor hours etc as needed after you add the part.
- Insert Row: Clicking this button will insert a new row immediately before the selected row. Selecting a group heading will not work when inserting as AdjustRite needs to know specifically where you want to insert the new row. Although you may select a row by clicking on any cell on the row it is best to click on the "selector" to the left of the number for the row, as this will highlight the whole row and is easier to see.
- Delete Row: If you have selected group title this button will delete all the parts within this group from the Selected Parts grid. If you select only a single part, that part will be deleted from the Selected Parts grid. In either case a warning box will pop up to make sure you really want to delete.
- Add Group: Clicking this button will add a new group at the bottom of the Selected Parts grid. Once the new group is added you can double click on the Group title and change it to whatever you need. You can then click on Add Row or Insert Row to add new parts to the new group.
- Logic: This button applies a complex series of rules to the parts you have placed on your estimate. For example, overlap and include relationships are dealt with. This means that in some cases the time will be reduced for some rows and in some cases additional rows will be added, based on the logic built into AdjustRite. You should apply logic after you have copied all the parts from the Available Parts grid to the Selected Parts grid using the Replace, Repair, R&I and LKQ buttons. You should also use Logic again if you have deleted an part from the Selected Parts grid. For example if you deleted a Replaced fender - apply logic will remove any fender adhesive, aiming of headlamps, etc associated with replacing the fender.
- Calculated Values : This button will tell AdjustRite to recalculated Calculated Values. This is useful if you have changed the hours for items in the available parts grid and want to recalculate the paint materials or shop supplies without going through the Logic process.
- "+" button expands all groups in the Selected Parts grid, although it is most often faster to expand individual groups as needed.
- "-" button collapses all groups in the Selected Parts grid.
![]()