
Unit Information |
Summary
All information for the Unit the estimate is created for, is shown on this page.
This information will either be entered when the estimate is created or the screen will be automatically filled in if you are creating this estimate for an existing unit.
Click on the Save and go to the next step -> link, at the top right of the screen, when you are done entering unit information for this estimate, to continue to the Rate Override screen.
Detail Instructions
This screen has a Choose Existing Unit link, which is a big time saver when you are doing an estimate for an existing customer and for a unit you already have in your system. When you select an existing unit the screen will automatically be filled in with the information from that stored unit. Click on the link above for detail instructions on selecting an existing unit.
If you choose an existing unit you will not be able to change the unit number or the VIN field - the only way to change those fields is via Unit Maintenance. You may need to change the information for existing units by using the Maintenance menus. It would not be appropriate to change this information while making an estimate.
Enter information for new units, because they aren't already set up. All information on this screen is optional, so you may create an estimate even if you leave this screen completely blank. However, the function of the main Estimate screen is effected by the information entered on this screen, so you will need to enter some information on this screen to simplify the entry of estimates.
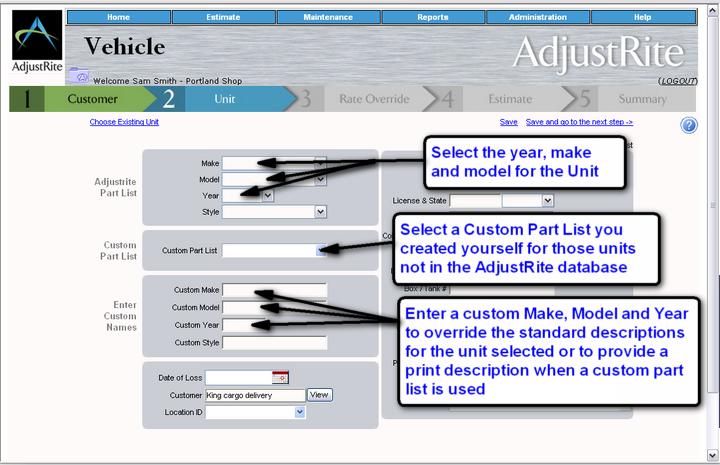
AdjustRite Part List. Select a Make, Model and Year to specify the appropriate parts list for the vehicle you are creating this estimate for. (Style may be selected, but doesn't effect the parts list used). AdjustRite part lists include significant "logic" so will be able to automatically calculate overlap and include relationships.
Custom Part List. You select your own custom part lists. You may create your own custom parts lists using AdjustRite and then specify which custom part list you want to use for an estimate here.
Enter Custom Names. You can enter your own Custom Make, Model, Year and Style on the Unit Information screen when you create an estimate. These will print on the Estimate reports instead of the Make, Model, Year and Style selected from the AdjustRite vehicle list. Custom information is optional, and is available to provide you with additional flexibility when creating your estimates.
Additional information - The following information may be entered on the Unit Information screen of each estimate. This information will be used to print on the reports, and in the case of the Paint Option will effect how estimates are calculated.
- Date of Loss: Enter the date of the loss here. You may either enter the date in the form of dd/mm/yyyy or just click on the small calendar picture in this field to pick the date of loss from a calendar.
- Customer:This displays the Customer Name from the Customer Information screen. You may not change this field.
- Location ID: You may not enter information in this field. This field will display the fleet location ID if there is one associated with a unit. You may select a location ID, if you did not choose an existing unit, by clicking on the Search button beside the field and looking up the Fleet Location. After you have selected a fleet location it will display in this field. If you change your mind and do not want to assign this unit to a location, just click on the Clear button to clear it.
- Fleet: This will display the fleet if you selected a location ID. Click on the View button to see detail fleet information. This field will not display at all on the screen if you have not selected a Location ID for this Unit.
- Unit #: Enter the unit number for this vehicle. You may enter any combination of letters, numbers and symbols.
- VIN: Enter the VIN number for this unit. This field does not force the entry of the entire number, so you may enter just the last 6 or 7 digits if that is the practice in your shop.
- License & State: Enter the license number for the unit and select the state in which it is licensed. All letters in the license number will automatically switch to upper case. You may select the state, after clicking on the state field by either pressing the first letter of the state until you see the state you want, or by clicking on the 'down' arrow and then scrolling down until you see the state you want and then clicking on it.
- Miles: Enter the number of miles on the odometer. You can enter "broken" here if the odometer is not working.
- Color/Paint Option: Enter the color of the truck in the first field and then select single color, two stage or three stage from the drop down list. You can enter additional color information in the note field for such situations as multiple colors. The system will use the paint options for calculating additional paint time, when appropriate, when you Apply Logic to an estimate.
- Paint Code: Enter the paint code here for the color you entered above.
- Box/Tank Make: Enter the Make of the Box or Tank for the truck is applicable.
- Box/Tank#: Enter the box or tank number if applicable.
- Engine / Horse Power: Select the manufacturer of your engine. If you do not see the manufacturer of your engine in this list and want to save it, you may enter that information in the Custom Engine field. You may also enter the horsepower for the engine.
- Custom Engine: Enter your engine here if you didn't find the manufacturer in the list above.
- Transmission: Enter the make of transmission and then select the number of speeds.
- Note: Enter any notes you have regarding this unit. This can be information such as two tone paint.
- Date of Loss: Enter the date of the loss here. You may either enter the date in the form of dd/mm/yyyy or just click on the small calendar picture in this field to pick the date of loss from a calendar.
![]()