
Customer Maintenance |
Summary
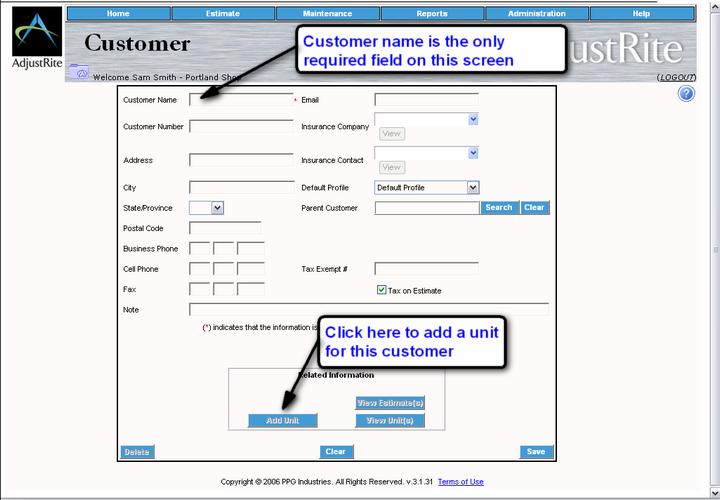
All information for regular customers is maintained on this screen. This screen will appear when you select "Add New" from the Maintenance/Customer menu or when you select a customer from the Customer Search screen.
The related information section of the screen let's you enter new units, view existing units and view existing estimates for the selected customer.
Information from this screen will be automatically filled in on the Customer Information screen of an estimate when this customer is chosen for an estimate.
You can add customers during the Estimate process by filling in the Customer Information screen for an estimate and then clicking on the "Add to Stored Customer List" check box before clicking on the "Next" button.
Detail Instructions
This screen contains detail information about a customer. You may enter any customer information you want to save for this customer. There are five actions you can take on this screen.
- Click on the Delete button to remove the customer displayed on the screen. You will be prompted to confirm you want to delete the record. Be careful, this will remove this customer from your database. Once you have deleted a customer, you will no longer be able to create or search for estimates for that customer.
- Click on the Clear button to clear all fields on the screen. This will let you enter another customer if you are adding information for multiple customers. Be sure to "Save" the customer before clearing, or you will loose what you have entered on the screen when you "Clear"
- Click on the Save button to save all information on the screen. Be sure to save before clearing if you want to enter information for another customer.
- Leave the screen by clicking on the AdjustRite logo or some other function from one of the drop down menus. The current screen of customer information will not be saved if you do this without first clicking on the Save button.
- Enter or change information on the screen (this includes the related information section).
To enter detail information on this screen you will move through the information boxes by pressing the Tab key when you are finished typing in each box. You can also click inside any box with your mouse to move directly to that box.
- Customer name: Enter the name of this customer. This field is required, so you may not save the information on this screen until something has been entered in the Customer Name field.
- Customer Number: You can optionally assign numbers to your customers. It is only necessary for customers to have numbers assigned if you are using the Date Import function.
- Address: Enter the street address
- City, State Zip:
- Enter the name of the city for this customer
- Click on the down arrow and then click on the state
- Enter the zip code
- Business Phone: Enter the area code, prefix and phone number. The program will automatically move from the first box to the second after you enter the first three digits and then again after the next three digits. Press Tab after entering the last four digits to move to the Cell Phone field.
- Cell Phone: Enter the cell phone number using the same rules as for the business phone.
- Fax: Enter the fax number using the same rules as for the business phone.
- Tax Exempt #: This is the customers federal tax exemption number
- Email: Enter a standard email address if the customer wants to be contacted by email. You can email estimate reports directly from AdjustRite, so this can be very convenient.
- Note: This does not print on estimates, but is for your own notes.
- Insurance Company: Click on the Search button to pick an insurance company, which will then list in this box. The insurance company is entered through the Insurance Company Maintenance screen. You can't type directly inside this box. Click on the Clear button if you want to remove the Insurance Company from this estimate.
- Default Profile: Click on arrow on the right of this field to pick a default rate profile. You can't type directly inside this box. If you leave this field blank the system will use the default profile for the active facility when making estimates for this customer.
- Parent Customer: Click on the Search button to pick a parent customer, which will then list in this box. You can't type directly inside this box. Click on the Clear button if you want to remove the Parent Customer.
- Tax on Estimate: Click in this check box if you want to calculate sales tax on estimates created for this customer. You may uncheck the box at the time the estimate if created if you want to change the status of.
- Related Information: This section lets you add units for this customer and view units and estimates associated with this customer.
- Add Unit will take you to the Unit Maintenance screen and automatically fill in this customer name as the customer for the new unit. You must enter a minimum of a year, make and model for the new unit.
- View Unit(s) will take you to the Unit Search screen, with the Owner Name already filled in so you will see just the units for this customer.
- View Estimates will take you to the advanced Estimate Search screen and will list only the estimates created for this customer.
![]()